Quantcast
Channel: Ohoh Blog - DIY and crafts
Viewing all 594 articles
Browse latest View live

DIY Monday # Stamps

$
0
0

Did you ever think on using items found around the house as stamps? They are a great way to customize paper and fabric. Here are 12 DIY who use fork, vegetable or cardboard roll as stamps. I'm sure you will found more object to use. So get some paint and start make napkins, table cloth, t-shirt, art wall or greeting cards! Happy Monday!

¿Alguna vez pensasteen usarlos objetos quotidianoscomosellos? Son una gran manerade personalizarpapel ytela.Aquí están12 DIY que utilizanun tenedor, un vegetal o un rollo de cartóncomosellos.Estoysegura de quevas a encontrarmásobjetoque puedas utilizar en tu casa.Así que con un poco de pinturapuedes empezar a personalizar servilletas,mantel,camiseta, ohacer tarjetas!Que tengas un bonitoLunes!

As tu déjà pensé à employer des objets du quotidien pour faire des cachets?C'est un excellentmoyen de personnaliserdu papieret du tissu.Voici12DIYqui utilisent comme cachet un fourchette,un légume oumême un rouleau en carton.Jesuis sûr que tu peux aussitrouverd'autres objetsà utiliser.Prends donc un peu de peinture commence àcustomiser desserviettes,une nappe, un t-shirts,un tableauou des cartes de vœux!Bonlundi!

Lemon stamps // Making Home base


Fork stamp // Momtastic

Wine cork stamp // Red circle crafts

Clothespin stamps // Easy Peasy Pie

Potato stamp // The forge style

Toilet paper roll stamps // Lime riot
More paper roll stamps inspiration on Powerful Mothering
Pencil stamp // Craftoart

 
Pencil eraser stamp // Lines across

Eraser stamps // Emuse

Rolling pin stamps // Ecosalon

https://www.facebook.com/ohohbloghttp://www.pinterest.com/amaohoh/http://www.bloglovin.com/en/blog/4218253https://plus.google.com/102515191913063314329/abouthttp://feeds.feedburner.com/OhohBloghttp://www.ohohblog.com/p/contact.html

DIY Monday # Gold party ideas

$
0
0

Are you ready to say goodbye to 2014? Did you already makes your list of good resolutions ? Do you needsome ideasto brightenyour party's Eve? Here are some simple DIY to add a festive gold touch at the last night of the year! Enjoy and let's the party begin!

¿Estás listo paradespedir a2014?¿Ya hicistetu listade buenas resoluciónes?¿Necesitasalgunas ideaspara darle brillo a tu fiestade Noche Vieja?Aqui tienes algunos DIY simple para añadirun toquede orofestivoa la últimanoche del año!Disfruta yqueempiece la fiesta!

Es-tu prêt àdire au revoir à2014?As-tudéjà fait taliste de bonnesrésolutions?Tu cherches peut-être des idées pourégayer ton reveillon de nouvel an?Voici quelquesDIYpour ajouterune touchefestive et dorée à la dernièrenuit de l'année!Profites-en etquela fête commence!


DIY serquins photobooth // Oh happy day

DIY sparkly bottle // Gatherings

DIY gold party hats // Almost makes perfect

 Confetti bar // Brooklyn bride

Glitter dipped cups // Gatherings

DIY glittery soles // Groom sold separately

 DIY confetti sticks // Best friends for frosting

Gold champagne cups // Somethings turquoise


Paper candle lampshade // Good housekeeping

https://www.facebook.com/ohohbloghttp://www.pinterest.com/amaohoh/http://www.bloglovin.com/en/blog/4218253https://plus.google.com/102515191913063314329/abouthttp://feeds.feedburner.com/OhohBloghttp://www.ohohblog.com/p/contact.html

2014 # your favorites DIY

$
0
0
Lastpostof the yearwith ago back in time,if youmissedthemhere are the 5DIYthat youpreferredin 2014!One lastword beforestarting2015:

THANK YOU!
for reading, commenting, sharing, and stopping here time to time!

Últimopost del añocon unvuelta atrás en eltiempo,si te los perdisteaquí están los5DIYquemas te gustaronen el 2014!Una últimapalabraantes de empezar2015:
 
GRACIAS!
para leer, comentar,compartir yparar aquíde vez en cuando!

Dernier post de l'année avec un petit retour en arrière, si tu les a manqués voici les 5 DIY que tu as préférés en 2014! Encore un dernier petit mot avant de commencer 2015:

MERCI!
de lire, de commenter, de partager, bref de passer par ici de temps en temps!

#1 Recycled denim basket
http://www.ohohblog.com/2014/01/diy-recycled-denim-basket.html

#2 DIY Paper wall art
http://www.ohohblog.com/2014/07/diy-paper-wall-art.html

 #3 DIY Side tables
http://www.ohohblog.com/2014/05/diy-side-tables.html

#4 DIY Paper wall lamp
http://www.ohohblog.com/2014/07/diy-paper-wall-lamp.html

#5 DIY Coral
http://www.ohohblog.com/2014/08/diy-coral.html

https://www.facebook.com/ohohbloghttp://www.pinterest.com/amaohoh/http://www.bloglovin.com/en/blog/4218253https://plus.google.com/102515191913063314329/abouthttp://feeds.feedburner.com/OhohBloghttp://www.ohohblog.com/p/contact.html

Happy 2015!

$
0
0

I wish you all a wonderful 2015!
Les deseo a todos un maravilloso 2015!
Je vous souhaite à tous une merveilleuse année 2015!

https://www.facebook.com/ohohbloghttp://www.pinterest.com/amaohoh/http://www.bloglovin.com/en/blog/4218253https://plus.google.com/102515191913063314329/abouthttp://feeds.feedburner.com/OhohBloghttp://www.ohohblog.com/p/contact.html

DIY Monday # Dining table

$
0
0
First postof the year, I hopeyou alright!Here are some ideasto makedining roomtables.These tutorialsusesimple and inexpensivematerials such asplumbing pipe, triplexboards orpallets.So you canmakeyour own dining tableat the lowest priceand at theperfect sizefor your house.Have a good week!

Primerpost del año, esperoque estás bien!Aquí estánalgunas ideas para hacermesas de comedor. Estos tutorialesempleanmaterialessencillos y baratostales como tubos de plomería, tableros de madera o tarimas. Así que puedes hacertu mesa sin gastar muchoyal tamaño perfectopara tu hogar.Que tengas una bonitasemana!

Premier post de l'année, j'espère que t'es en forme! Voici quelques idées pour fabriquer des tables de salle à manger. Ces tutoriels emploient des matériaux assez simples et économiques comme des tuyaux de plomberie, des panneaux triplex ou des palettes. Tu peux donc fabriquer ta table à petit prix et aux dimensions qui convenient à ton intérieur. Bonne semaine!

DIY pipe table // Vintage revivals

DIY pallet table // Lana Red

DIY table // Creature comforts

The easy DIY table // Homemade-modern

DIY Honeycomb table // A Beautiful Mess

Wood scrap table // Handimania

DIY dining room table // A Beautiful Mess

DIY minimalist table // Amber interiors

DIY plumbing pipe table // 4 men 1 lady

Small table // Home story

 Rustic table // Paper daisy design

Glow table // Instructables

https://www.facebook.com/ohohbloghttp://www.pinterest.com/amaohoh/http://www.bloglovin.com/en/blog/4218253https://plus.google.com/102515191913063314329/abouthttp://feeds.feedburner.com/OhohBloghttp://www.ohohblog.com/p/contact.html

House shelf makeover

$
0
0

I finally took the time to upcycle this little house shelf. My in-laws gave it away when they moved....6 years ago! I thought it will makes a nice toy storage with a coat of paint. The shelf is in my daughter's room, and the unfinished wood wasn't matching the room decoration. So it was time for a little redo!

Finalmente metomé el tiempo paraterminaresta pequeñaestante.Mis suegroslo dieroncuando se mudaron....hace 6 años!Penséque, conuna mano de pintura, hariáun lindo almacenamiento para losjuguetes .Está enel cuarto de mihija,y la madera sin acabado  no coincidía conladecoración del cuarto.Así que erahora de un cambio!

J'ai finalementpris le temps derefairecette petite étagère en forme de maison.Mes beaux-parentsl'ont donnéequand ils ont déménagé....il y a 6 ans! Avec une couche de peinture, c'est unchouette rangement pour les petits jouets.L'étagère estdans la chambre dema fille,et le boisbrutne s'accordait vraiment pas àladécoration de la pièce.Une rénovation s'impossait donc!

First,I cutthe roofendsto give it a moremodern shape.Then Icleaned and sandedthe wood.
 
En primer lugar,recortélas extremidades del techopara darleuna forma un pocomás moderna.Luego,limpiéy lijé la madera.

Premièrement, j'ai coupé les extrémités du toit pour lui donner une forme un peu plus moderne. Ensuite j'ai nettoyé et poncé le bois.


I applied3 coats ofwhite acrylic paint.

Apliqué3capas de pinturaacrílica blanca.

J'ai appliqué 3 couches de peinture acrylique blanche.


Finally,I put washitapeon the outer edge.It's highlight the shapeof the houseand gives anice touch of color.The washitapecomes fromIkea.

Por último,he pegadowashi tape en el borde exterior.Destacalaforma de la casay le daun toque decolor.Compre la cinta enIkea(y pueden lloran conmigo si, como yo, viven en un país donde no hay tiendas Ikea).

Pour terminer, j'ai collé du washi tape sur le bord extérieur. Ça souligne la forme de la maison et donne une petite touche de couleur. Le washi tape vient de chez Ikea. 


And we put all pink toys in it!

Y pusimos todos los juguetes rosas dentro!

Et on a mis tous les jouets roses dedans!


Little frozen's princess seem very pleased with her upgraded shelf!

La pequeña princesa parece contenta con su nueva repisa!

La princesse "Anna" semble contente avec sa nouvelle étagère!

https://www.facebook.com/ohohbloghttp://www.pinterest.com/amaohoh/http://www.bloglovin.com/en/blog/4218253https://plus.google.com/102515191913063314329/abouthttp://feeds.feedburner.com/OhohBloghttp://www.ohohblog.com/p/contact.html

Make a mirror tray

$
0
0

If you have an old frame you don't know what to do with, here is a perfect upcycle idea. I will show you how to make a chic mirror tray to display your perfumes and beauty product. A simple way to give your room a glam touch! You will find the complete step by step tutorial on DIY Ready!

Si tienes unviejo marco, y nosaber quéhacer con él,aquí estáuna ideapara reciclarlo.Te mostrarécómo hacer unaelegante bandeja conespejopara despachartusperfumes yproductos de belleza. Una forma sencilla dedarle a tuhabitación un toqueglam! Encontrarás elpasoa pasocompleto en DIYReady!

Si tu as un vieux cadredont tu ne sais pasquoi faire, voici une idée pour le recycler.Je vais temontrer comment faireun chic plateaumiroir pourrangertesparfums et tes produits de beauté. Une façon simplede donner à ta chambre une toucheglamour! Tu trouverasle tutoriel complet sur DIY Ready!


https://www.facebook.com/ohohbloghttp://www.pinterest.com/amaohoh/http://www.bloglovin.com/en/blog/4218253https://plus.google.com/102515191913063314329/abouthttp://feeds.feedburner.com/OhohBloghttp://www.ohohblog.com/p/contact.html

Free printable calendars

$
0
0

I made a calendar for 2015 but it doesn't turn as good as I planed! So here are 20 beautiful free printable calendars to enjoy! I wish you a wonderful 2015, full of joy and adventures!

Habia hecho uncalendario para el2015, perono terminotan bueno comolo había planeado! Así que aquí están20hermosos calendariosque puedes imprimir!Te deseo unmaravilloso año 2015, lleno de alegría yaventuras!

J'ai faitun calendrierpour 2015, mais le résultat n'est pas top! Voici donc20magnifiquescalendriers à imprimer!Je te souhaiteune merveilleuse année 2015, pleine de joieet d'aventures!


https://www.facebook.com/ohohbloghttp://www.pinterest.com/amaohoh/http://www.bloglovin.com/en/blog/4218253https://plus.google.com/102515191913063314329/abouthttp://feeds.feedburner.com/OhohBloghttp://www.ohohblog.com/p/contact.html

DIY Monday # Modern jewelry holders

$
0
0

Having the jewelry organized isn't an easy thing! I tried to keep them in different boxes but it's a mess. I forgot what I have and end up wearing the same stuff all the time. So here are some nice DIY to display all yours necklaces, bracelets and earrings! Have a nice week!

Tenerlas joyasorganizadas noes una cosa fácil!Traté deguardarlasen cajas diferentes, pero es unlío.Se me olvidalo que tengo yterminousando las mismascosas todo el tiempo.Así que aquí estánalgunosDIYpara ordenartodo tuscollares, pulserasypendientes!Que tengasuna bonita semana!

Garderles bijouxrangés ce n'est pas facile!Je ai essayé deles mettre dansdifférentes boîtesmais c' estle bazar.J'en oublieet je fini parporterla même chosetout le temps.Voici doncquelques beaux DIYpour organisertous tescolliers, braceletset boucles d'oreilles!Passe une bonnesemaine!

 Thread rack jewelry holder // One good thing by Jillee


 Jewelry block // Emily Henderson


DIY porte bijoux // Le marché éclectique

DIY Jewelry holder // Julie Ann Art

 DIY jewelry organizer // The north end loft

Copper earrings holder // Apartment therapy

 DIY earrings organizer // luri & wilma

DIY Jewelry Organizer // Monster Circus

 Lace earring holder // For the makers

Arrow jewelry holder // Lemonade Makin'mama


https://www.facebook.com/ohohbloghttp://www.pinterest.com/amaohoh/http://www.bloglovin.com/en/blog/4218253https://plus.google.com/102515191913063314329/abouthttp://feeds.feedburner.com/OhohBloghttp://www.ohohblog.com/p/contact.html

DIY crates storage

$
0
0

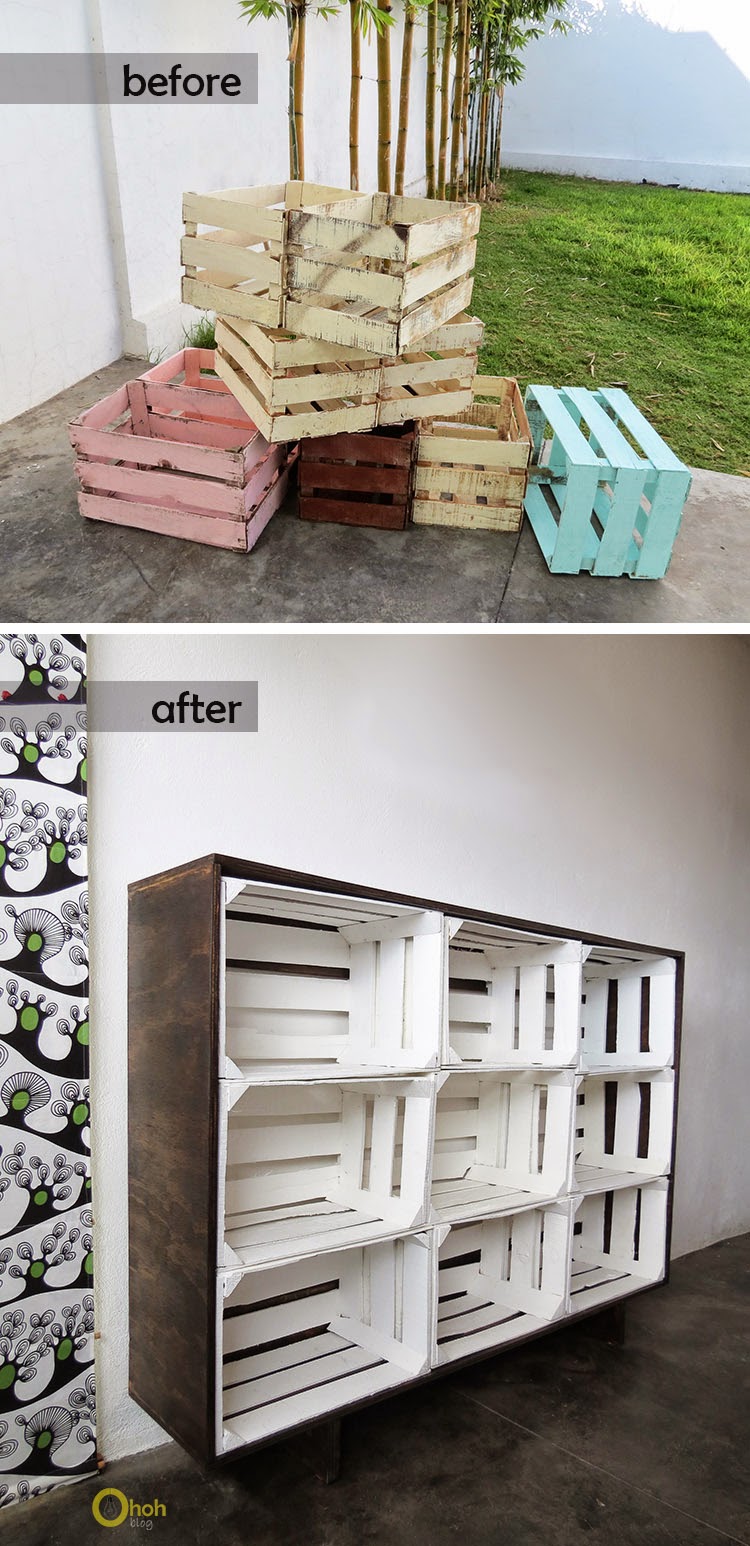
When my friend asked me if  I wanted some crates she was giving away, I just answered: Yes of course! I want them all! I didn't know exactly what I was gonna make with them, but I was sure I could use them!
Please tell me I'm not the only one who freak out with all the toys kids are gonna get for Christmas. It's always the time of the year when I'm thinking I need to organize toys and get extra storage!
I did redo a house shelf for my girl's bedroom.And it was also necessary to find a solution about the cars toy storage problem. So those crates were the solution.

The first thing to do is arrange your crates the way you want them on the shelf (here I made 3 row and 3 columns). Take the measurements of your crates together, length, high and width. Add the thickness of the panel / wood you gonna use (I used 16mm plywood).

Example:
Measurements of my crates together 150 cm length X 100 cm high X 30 cm width. Measurements of plywood pieces
153.2 cm x 31.6 cm (2 horizontal pieces)
100 cm x 31.6 cm (2 vertical pieces)
150 cm x 12 cm (2 back pieces)
12 cm x 31.6 (4 feet pieces)

Cuando miamiga me preguntósi queríaunas cajasque estabaregalando, solo conteste: Sí, por supuesto! Las quiero todas! No sabíaexactamente lo queiba a hacercon ellas,pero estaba segura de poderusarlas! 
Por favor, dimeque no soy laúnica que enloquezcacon todos los juguetes que los niñosrecibenpara Navidad o los Reyes Magos.Siempre en esta epocadel año, estoy pensandoque necesitoorganizar losjuguetesy buscaralmacenamiento adicional!
Hiceun estante de casitapara el dormitorio demi nina. Y tambiéneranecesario encontraruna soluciónen el problemade almacenamiento decochesde juguete. Así queesas cajaseran la solución.


Lo primero que debeshacer esorganizar tuscajas(aquíhice3 filasy3columnas).Tomas lasmedidas de lascajasjuntas,largo, anchoy alto.Tienes que añadirelgrosor del panel/ maderaqueva a utilizar(usétriplay de 16mm).
 
Ejemplo:
Las medidas demiscajasjuntas son150cm de largo x100cm de altox30cmde ancho. 

Las medidas de las piezasde madera son:
153,2cmx31,6cm(2piezas horizontales)
100cmx31,6cm(2piezas verticales)
150cmx 12 cm(2piezas para la parte trasera)
12x31.6cm(4piezas para los pies)


Quand monamie m'a demandési je voulaisdes cageots dont elle se débarrassait, j'ai vite répondu: Oui, bien sûr! Je les veuxtous!Je ne savais pasexactement ce que j'allais en faire, mais j'étais sûr que jepouvaisles utiliser! S'il te plaît dis moi que jene suis pasla seule quipaniqueravec tous les jouetsque les enfantsreçoivent à Noël (ou Saint-Nicolas). C'esttoujours la période de l'année où j'ai besoind'organiserles jouetset de trouver des rangements supplémentaires!
J'airefaireune petite étagère en formede maison pourla chambre de mafille.Et il étaitégalement nécessaire detrouver une solutionau problème des petites voitures.Cescaissesétaient donc la solution.


La premièrechose à faire estde positionner tescaisses (icij'ai faittroisrangée ettrois colonnes).Prenezlesmesures de voscaissesensemble,longueur,hauteur etlargeur.Ajouterl'épaisseurdu panneau/bois que vousallezutiliser(j'ai utilisé dutriplex 16mm).
 

Exemple:
Mesuresdemescaissesensemblelongueur150cmX hauteur 100cmxlargeur 30cm. 

Mesuresdes panneaux 16 mm
153,2cmx31,6cm(2 pièceshorizontales)
100cmx31,6cm(2 piècesverticales)
150cmx 12 cm(2 piècesde derrière)
31,6x12cm(4
pièces pour les pieds)
 

I first thought on using wheels but couldn't find some I like, so I end up using scrap plywood pieces ( It' s why they are not the same dimension).
Let's start assembly. Glue 2 small pieces of plywood together to make each foot. Take the bottom piece, glue and screw the feets on it using metal brackets.

Al principio penséusar ruedas para los pies, pero nopude encontrarunas que me gustaban,así quetermine usandopiezasde madera(por eso no son de la misma dimensión).
Vamos a empezarel montaje.Pegue2pequeñaspiezas de madera contrachapadajuntas para hacercada pie.Tomela pieza inferior,pega yatornilla lospiessobre la piezautilizandosoportes de metal.


Jeai d'abord penséutiliser desroues pour faire les pieds, maisje n'en ai pas trouvées qui convenaient,j'ai donc fini par employer des morceaux de triplex(s'est pourquoi ilsne sont pas de la même dimension).
On commence
à assembler.Colledeuxpetitsmorceaux de contreplaquéensemble pour fairechaque pied.Prendla pièce du fond, colleet visse lespiedsdessusl'aide desupports métalliques.


To give rigidity to the frame structure, nail and glue a piece of plywood on one side of the top and bottom pieces.

Para darrigidez ala estructura, clava ypegar unapieza de maderasobre un ladode las piezassuperior e inferior.

Pour donnerde la rigidité àla structure, cloueetcolle unmorceau de contreplaquésurun côté despiècessupérieure et inférieure.


Place the different pieces on the floor, use a set square to be sure all pieces are straight. Glue and nail every piece with each other.

Coloquelas diferentes piezasen el piso, useuna escuadrapara asegurarse deque todas las piezasson rectas.Pegue yclave cadapieza conla otra.

Place les différentes pièces sur le sol, utilise une équerre pour être sure que toutes les pièces sont placées à angle droit. Colle et cloue chaque pièce avec l'autre.


Put the shelf on feet and check that all the crates fits inside.

Coloqueel estanteen los piesy comprueba quetodas las cajasencajan dentro.

Mets le meuble droit et vérifie que les cageots rentre tous à l’intérieur.


You can stain and varnish, or paint the shelf, as you like best.

Puedesentintar y barnizar,o pintarel estante,comomás te gusta.

Tu peux teindre et vernir, ou peindre l'étagère, comme tu préfères.


When it's dry put the crates back in place and store your items. I didn't nail or glue the crates together but you can do it if it's necessary.
My son helps me to organize (almost) all his toys car in it. I love the rustic touch the crates gives to the shelf and my son is very happy to have all his cars on hand.

Ponlas cajasen su lugar yalmacenatus cosas.Noclave, nipegue lascajas, pero puedes hacerlosi esnecesario.
Mi hijome ayudo aorganizar(casi)todos sus cochesde juguetesen la repisa.Me encanta eltoque rustico que las cajasdanael estantey mi hijoes muyfeliz de tener todos sus carritos a la mano.


Quand c'est sec remets les caissesen place etranges tes affaires.Je ne aipas clouéou colléles caissesensemble, maistu peux le fairesi c'estnécessaire.
Mon filsm'a aid
éàranger(presque)toutessesvoiturededans.Je aime la touche rustique queles cageotsdonneà l'étagere etmon fils esttrès heureux d'avoirtoutesses voituresà portée de main.


* * * Merci Flora * * *

https://www.facebook.com/ohohbloghttp://www.pinterest.com/amaohoh/http://www.bloglovin.com/en/blog/4218253https://plus.google.com/102515191913063314329/abouthttp://feeds.feedburner.com/OhohBloghttp://www.ohohblog.com/p/contact.html

DIY Monday # Desk

$
0
0

Happy Monday amigos! Today inspiration is all about desk! We all need a little nook to work at home. So here are some beautiful tutorials from easy peasy trestle desk too big office table. I'm sure you will find something to fit your space.
From today, I will make a little change on the blog: Posts will be writing only in English. It just takes me a lot of time to translate every thing and I prefer to work on more DIY and crafts tutorials. I hope it will be OK for those who where used to read the blog in Spanish and French. You can use the Google translate tool on the sidebar, and I will be happy to answers your comments and questions in English, Spanish or French. Thank you for your understanding! Have a great week!

Hola amigos! La inspiración de este Lunes es sobre escritorios! Todos necesitamos un pequeño rincón para trabajar en casa. Así que aquí están algunos tutoriales para hacer escritorios, desde uno fácil de caballete hasta una grande mesa para oficina. Estoy segura de que encontrarás algo que se adaptara a tu espacio.
A partir de hoy, voy a hacer un pequeño cambio en el blog: Solo escribir los artículos en Inglés... Simplemente las traducciones me toman mucho tiempo y prefiero trabajar en más DIY y tutoriales. Espero que siguen leyendo el blog aunque no estara en español. Puedes utilizar la herramienta de Google traduce en la barra lateral, y como siempre me puedes dejar tus comentarios y tus preguntas en español. Gracias por tu comprensión! Que tengas una gran semana!


L'inspiration d'aujourd'hui: le bureau! Nous avons tous besoin d'un petit coin pour travailler à la maison. Alors, voici quelques beaux tutoriels, depuis un bureau simple fait avec des tréteaux jusqu’à une grande table de travail. Je suis sûr que tu trouveras quelque chose qui s'adapte à ton espace.
A partir d'aujourd'hui, il va y avoir un petit changement sur le blog: les articles seront uniquement écrit en anglais ... Il me faut beaucoup de temps pour traduire chaque article et je préfère travailler sur les DIY et les tutoriels. Je espère que tu continueras a suivre le blog même si il n'est plus en français. Tu peux utiliser l'outil Google translate dans la barre latérale, et je serai toujours heureuse de répondre à tes questions et commentaires en français. Merci pour ta compréhension! Passe une bonne semaine!

Desk office table // A Beautiful mess

Fold up office // HomeMade Modern

Cinder block desk // The Merry Thought

DIY plywood desk // Sarah's big idea

 Ikea hack desk // The pretty providence

Minimal oak desk // Design*Sponge

The flip desk // HomeMade modern

Wooden desk // We lived happily even after


DIY desk // Manhattan Nest

 DIY Murphy Desk // Shanty 2 Chic

DIY pipe desk // Poppy talk

DIY Valentine key ring

$
0
0


Here is a sweet idea to make a valentine'day gift: a leather key ring! I make the full tutorial for Dream a Little Bigger. You will only need a few simple supplies. I'm sure your family and friends are gonna love this practical handmade present!


https://www.facebook.com/ohohbloghttp://www.pinterest.com/amaohoh/http://www.bloglovin.com/en/blog/4218253https://plus.google.com/102515191913063314329/abouthttp://feeds.feedburner.com/OhohBloghttp://www.ohohblog.com/p/contact.html

Valentine's day free printable

$
0
0

If you want to give your house a sweet touch for Valentine's day, the easiest option is a nice printable. You just have to print the 4 PDF files, cut out the white edges and hang it.

I use double face tape, but nice washi tape will also work perfectly. If you want a more classy look, you can frame it! 


You have two options to print: a 4 sheets design (like the picture) or a smaller printable in one sheet.


                                   VALENTINE'S DAY FREE PRINTABLE

As it's the first printable I make, I will really appreciate your comment and suggestion! I hope you will like it! Have a nice weekend Amigos!


https://www.facebook.com/ohohbloghttp://www.pinterest.com/amaohoh/http://www.bloglovin.com/en/blog/4218253https://plus.google.com/102515191913063314329/abouthttp://feeds.feedburner.com/OhohBloghttp://www.ohohblog.com/p/contact.html

DIY Monday # Christmas garlands

$
0
0

Christmas is coming and it is already time to think about the decorations. Usually, I don't put the tree before December ... but you can get a head start and makes beautiful garlands to hang around the house. Have a nice week.

Se acerca la Navidad y ya es hora de pensar en la decoración. En general, pongo el árbol hasta diciembre ... pero nos podemos adelantar un poco y empezar a hacer unas hermosas guirnaldas para colgar alrededor de la casa. Que tengas una bonita semana!

 Noël approche et il est déjà temps de songer aux décorations. En général je ne sors pas le sapin avant décembre...mais on peut prendre un peu d'avance et commencer à fabrique des jolies guirlandes qu'on pourra accrocher partout dans la maison. Bonne semaine!

 Copper stars // Tara Dennis

DIY Christmas garland // One Perfect Day


Gold triangle garland // Almost makes perfect

DIY felt Christmas tree garland // This pretty sight

DIY Oversized holly and berries garland // The house that lars built

DIY paper tassel garland // Live. Love. Larson

Modern paper tree garlands // Nalle´s House


DIY yarn garland // Design improvised

DIY Geometric garland // Lines across

DIY fancy paper chain // Tell love and chocolate

https://www.facebook.com/ohohbloghttp://www.pinterest.com/amaohoh/http://www.bloglovin.com/en/blog/4218253https://plus.google.com/102515191913063314329/abouthttp://feeds.feedburner.com/OhohBloghttp://www.ohohblog.com/p/contact.html

DIY Monday # Valentine's day paper crafts

$
0
0

Are you ready for valentine's day? If you run out of time and are looking for cute and easy little gifts, I'm pretty sure you will be happy with this selection. All crafts are made with paper, you will find origami, free printable, and a mini book. Have a nice week and don't forget to make happy the people you love!

Printable pillow boxes // Lines Across

Heart yarn cards // Hello, wonderful

Sandwich wrapper printable // The sewing rabbit

Free printable bonbon box // Hello, wonderful


Origami envelope // Kdesign

Free heart printable // Making in the mountain

3D geometric heart // The things she makes

Printable valentine cards // Almost makes perfect

Free coloring page // Tried & true


And if you want more, you can get my free printable wall art !!!


https://www.facebook.com/ohohbloghttp://www.pinterest.com/amaohoh/http://www.bloglovin.com/en/blog/4218253https://plus.google.com/102515191913063314329/abouthttp://feeds.feedburner.com/OhohBloghttp://www.ohohblog.com/p/contact.html

Pop-up Valentine's day card

$
0
0


There is only a few day left until Valentine's day, but you still have enough time to make a cute pop-up heart card. It's an easy and fast craft, you can even use some scrap paper you have around to make it. So take a look at the tutorial I made for Dream a Little Bigger.

If you want to give your home a sweet Valentine's day touch, check the free printable I made last week!


https://www.facebook.com/ohohbloghttp://www.pinterest.com/amaohoh/http://www.bloglovin.com/en/blog/4218253https://plus.google.com/102515191913063314329/abouthttp://feeds.feedburner.com/OhohBloghttp://www.ohohblog.com/p/contact.html

DIY Monday # Bathroom

$
0
0

Bathroom maybe one of the hardest room to get organized. Between shampoo, soap, makeup, beauty products, hair accessories...things can get out of control very easily! No need to say that if you've kids the mess is even worse! Am I the only one who have three different toothpaste? (princess's toothpaste, Car's toothpaste and regular one)
As we all want to enjoy a relaxing time in our bathroom, here are some DIY to organize and embellish it. Have a nice Monday!

 DIY towel ladder // Smitten studio


Copper cup organizer // A beautiful mess


 DIY wooden tissus box cover // The Merrythought


DIY Laundry bag // Design love fest

 Homemade cleaner // Live simply

 DIY towel hanger // Monsters circus

 DIY painted rug // Homemade by Carmona

 DIY mason jar storage // Liz Marie blog

 DIY rustic modern bench // Timber and lace

 Statement shower curtain // A beautiful mess


https://www.facebook.com/ohohbloghttp://www.pinterest.com/amaohoh/http://www.bloglovin.com/en/blog/4218253https://plus.google.com/102515191913063314329/abouthttp://feeds.feedburner.com/OhohBloghttp://www.ohohblog.com/p/contact.html

Make a planter with a plastic bottle

$
0
0

I like plants but I'm pretty bad at taking care of them. I was in charge of my mother in law plants when she went on holidays...well let just say I'm happy to have found the same flowers she had to replace them! I can only take care of two kind of plants: cactus because you never need to water them and papyrus cause you always need to water them....anything in between is a problem!
So I wanted to give a try with a self watering plant pot, the kind when you water to much or to little the plants don't die right away! What better than a recycled version!


 Take a 6L plastic bottle and cut the neck.


Take a piece of fabric and fix it on the bottle neck with a rubber.


Put the neck bottle part inside of the bottle bottom.


Add soil and put your plant in it. Water it, the excess water remains in the bottom of the bottle, and if you forget to water the soil stays wet anyway....well I let you know if it works!


As practical as the bottle planter is, it's definitively not pretty. So I made a fabric basket, following Haberdashery Fun's tutorial. And Voila!


If you like the hexagonal tray, the tutorial ishere. And for the stars cushions, you can have a look here.

https://www.facebook.com/ohohbloghttp://www.pinterest.com/amaohoh/http://www.bloglovin.com/en/blog/4218253https://plus.google.com/102515191913063314329/abouthttp://feeds.feedburner.com/OhohBloghttp://www.ohohblog.com/p/contact.html

How to make letters cushions

$
0
0


As I said it before, I love cushions. Easy to do they add a nice color touch at the interior! This time, I gave a try with letters cushions, I made those for my son. It was fun to sew his name ( and I'm glad we piked a short one)! As you may know I'm a contributor for Dream a Little Bigger. So, you will find the step by step tutorial over there. Have a nice weekend!


https://www.facebook.com/ohohbloghttp://www.pinterest.com/amaohoh/http://www.bloglovin.com/en/blog/4218253https://plus.google.com/102515191913063314329/abouthttp://feeds.feedburner.com/OhohBloghttp://www.ohohblog.com/p/contact.html

DIY Monday # Origami

$
0
0

Paper is the most common office and crafts supplies, but did you ever thought on using it as decoration?  Here are some amazing home decor origami projects. Easy to do but with a impressive impact. Let's have fun folding paper and decorating! Have a nice Monday!


DIY origami decor piece // Kristi Murphy

DIY origami wall display // Design*Sponge


Cache pot en papier // Madame citron

Origami eggs holder // How about orange


Origami ball // One dog woof

Paper frames // Kreativbuehne

Origami crane mobile // Clad and cloth

Origami vase // Ludorn

Paper lantern // Skona hem

https://www.facebook.com/ohohbloghttp://www.pinterest.com/amaohoh/http://www.bloglovin.com/en/blog/4218253https://plus.google.com/102515191913063314329/abouthttp://feeds.feedburner.com/OhohBloghttp://www.ohohblog.com/p/contact.html
Viewing all 594 articles
Browse latest View live


Latest Images